Create and edit an activity
It is recommended to divide the planning into activities. An activity is a planning element with a defined start and end date or a defined duration which is narrowed down content-wise by the underlying work packages. Please follow these steps to divide the planning into several activities:
 For more information about work packages, please see the category Work packages.
Open an existing project or create a new one.
![]() For more information on how to create a project see Create a project.
For more information on how to create a project see Create a project.- In the project, on the Start tab, in the Sections group, click Planning.
-
Create a planning by adding activities. In the Planning page, in the Edit group, click New Activity. Enter a name directly in the row.
![]() You can also add another project element like a milestone. For more information, see Create and edit a milestone.
You can also add another project element like a milestone. For more information, see Create and edit a milestone. To add more details to the activity, click Edit in the Edit group or double-click on the selected activity. In the Edit Activity dialog box, you can adjust the activity to your requirements:
- General information on the activity on the Standard tab
-
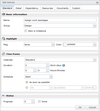
In the Basic information area, in the Name box, you can change a name. In the Group box choose a group to which the activity belongs. It defines the costs for the activity.
![]() Each group has an internal price per hour. You can change this price/group or add a new one via the InLoox PM Web App options. For more information, see Generate and edit groups.
Each group has an internal price per hour. You can change this price/group or add a new one via the InLoox PM Web App options. For more information, see Generate and edit groups. - In the Basic information area, you can also define whether a planning element is a milestone. Select Item is a milestone check box.
- In the Highlight area, select from the Flag drop-down list a color to mark the activity in the planning list. You can also select a color to mark the activity in the Gantt chart by clicking Color and choosing some from the drop-down list.
-
In the Time frame area, define its duration and dependencies regarding other planning elements.
The current date will be set by default in the new project.Select Standard as a calendar or choose a user-defined working time calendar from the list in the Calendar box.
![]() For more information on how to set a working time calendar, see Create a working time calendar.
For more information on how to set a working time calendar, see Create a working time calendar.- In the Duration box, enter the duration in days and enter the hours in the box below.
- In the Schedule box, define the constraints of the activity. Choose between Start or End.
- The constraint As soon as possible is set up as default value for the Start and As late as possible for the End.
-
Choose below, if you want to set your own date and the constraints. In the drop-down list choose between On, No earlier than, No later than.
![]() For more information about the dependency and constraints, see Create planning elements dependency.
For more information about the dependency and constraints, see Create planning elements dependency.
- In the Status area, define the progress or activate the done check box to display the processing status of the activity.
-
In the Basic information area, in the Name box, you can change a name. In the Group box choose a group to which the activity belongs. It defines the costs for the activity.
- More information on the activity on the Details tab
-
In the Description box enter some important information on the activity, e.g. the targeted deliverables or internal remarks.
![]()
- The information from the Description box will be sent via notification to the divided resources. See Display and process work package for more information about the notifications.
- InLoox PM Web App provides you with a range of formatting features. For the detailed description, see Create and change comments in the Customize comments section.
- In the Parent box, select a group or parent, to which the activity belongs.
- In the WBS code box, enter a work breakdown structure code to identify activities and milestones in large projects.
- In the Location box, enter a location.
-
In the Description box enter some important information on the activity, e.g. the targeted deliverables or internal remarks.
- Set dependencies between activities / planning elements on the Dependency tab
-
Choose from the Available list one planning element and click >>.
InLoox PM Web App creates a chronological interdependency between the activity and the selected successor. -
The Selected list contains all successors of the activity currently being edited. To remove a successor click on the button <<.
InLoox PM Web App consequently deletes the chronological interdependency between the activity and the selected successor. - Define the dependency between planning elements by choosing the item in the Selected list.
- Click Edit and choose between Start to start, Start to end, End to start, End to end in the Edit Dependency dialog box.
- Set up a lag in the Lag area.
-
Activate the Negative control box to create a negative lag.
![]() For more information about dependencies and lags, see Create planning elements dependency.
For more information about dependencies and lags, see Create planning elements dependency.
-
Choose from the Available list one planning element and click >>.
- Further information on the activity on the Custom tab
Click in the previously created custom box and enter a new value for it.
![]() For more information on how to add a new custom field in InLoox PM Web App, see Create a custom field.
For more information on how to add a new custom field in InLoox PM Web App, see Create a custom field.
- General information on the activity on the Standard tab
- Click OK to save the changes.

