Planning
Article content
Constraints
In InLoox PM 7 Web App, you can set time constraints for activities and milestones in your project plan, such as:
- Start on / Finish on
- Finish no earlier than / Finish no later than
- Start no earlier than / Finish no later than
- As soon as possible / As late as possible

Then, InLoox PM 7 Web App integrates the respective planning element according to this specification into the project planning.
 For more information on constraints, see Create planning element dependencies.
Dependencies
With dependencies, you can define logical relationships between planning elements and therefore use methods of the network planning. InLoox PM 7 Web App offers the following dependencies:
|
Dependency |
Example |
|---|---|
|
End-to-Start |
|
|
Start-to-Start |
|
|
End-to-End |
|
|
Start-to-End |
|


 For more information, see Create planning element dependencies.
Lags
In version 7, you can use positive and negative time lags between planning elements in your project planning. So, you can easily depict overlaps in time of planning elements as well as lead and waiting times.
 For more information, see Create dependencies between planning elements.
![]()
Backward scheduling
InLoox PM 7 Web App offers you both planning directions, forward scheduling and now, also, backward scheduling. Now you can decide whether you want to develop your project plan from your current starting point or based on the desired project results.

 For more information, see Backward scheduling.
Skill management
Enter the skills of your team members in the InLoox PM options. As soon as you have created the respective skills in the InLoox PM options and you have assigned them to one or several resources, you can search for the specific skills whenever you want to add a resource in the project.


- For more information about how to assign skills to resources, see Assign skills to resources.
- For more information on how to open the InLoox PM options, see Open the InLoox PM options.
Undo and redo
InLoox PM 7 Web App enables you to reverse entries or to restore cancelled entries. Click therefore in the planning on the Edit tab Undo to reverse the latest entry or click Redo to restore a reversed entry  .
.
Individual working time calendars
In the InLoox PM options, you can now create individual working time calendars to integrate for example part-time, shift or weekend work. With several individual working time calendars, you can include different working times or holidays at different company sites. Then, you can assign different working time calendars to the different elements in the project planning.

 For more information, see Set a working time calendar.
Individual color settings
Now, you can highlight planning elements in the planning in user-defined colors, e.g. to mark departmental responsibilities or to highlight priorities. Select therefore a planning element from the planning and click Color  in the Highlight group on the Edit tab. The planning element is then displayed in the selected color in the Gantt chart.

 For more information on how to customize the view of your planning, see Work with the planning.
Filter and sort
Filter and sort your project planning according to your individual information needs. These features help you to keep an overview, especially of extensive project plans. You find them in the planning on the View tab in the Arrange group.

 For more information on how you can display your planning filtered or sorted by specified criteria, see the Adjust a view section in the article Work with the planning.
Edit in-line
In InLoox PM 7 Web App, it is no longer necessary to open planning elements and to edit them in a dialog box - you can do this directly in-line. Click therefore in the planning in the line of the planning element that you want to adjust and change its name, start or end date.

 For more information on this topic, see Work with the planning.
Quick selection of resources
Now, you cannot only assign project resources in InLoox PM Web App via the Select Contact dialog, but also via quick selection, e.g. in the time tracking or the planning. Click the arrow ![]() to receive a compact pre-selection of often deployed resources.
to receive a compact pre-selection of often deployed resources.

Please see the respective help categories to receive more information on this topic.
Notification in advance
Define the period of the notification in some day(s).
Open the InLoox PM options.
![]() For more information, about where to find the InLoox PM options, please see Open the InLoox PM options.
For more information, about where to find the InLoox PM options, please see Open the InLoox PM options.Click Planning in the navigation pane and then click Notification Details. Below you see the Notifications Details area.
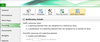
Select the check box Enable prenotificationto define in how many days the notification will be sent.

- this feature is valid only for the actvie projects.
- the project schould not be archived or has a progress of 100%.
- the planning element in the notification should not be done or has a progress of 100%.
 For more information, about where to find the InLoox PM options, please see