Create custom fields
Custom fields enable you to expand the data model of InLoox PM Web App to suit your own requirements. New fields can be created for the entire project or for one page of it: mind maps, planning, time tracking, documents or budgets. Field names are freely definable. InLoox PM Web App supports several data types in custom fields. Please follow these steps to create a new custom field:
Open the dialog box InLoox PM options.
![]() For more information on how to open the InLoox PM options, please see Open the InLoox PM options.
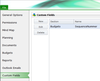
For more information on how to open the InLoox PM options, please see Open the InLoox PM options.Click Custom Fields in the navigation pane. On the right side you see the Custom Fields section.
- Please select one of the following actions:
- Create a new custom field by clicking New.
- In the Custom Field dialog box, in the Name field, type a name for the custom field that you want to create.
- Select the intended location from the Location drop-down list of the field (i.e. the list in which it is supposed to be displayed).
- Select a Type from the drop-down list. Possible types are:
- Text: free text value/string.
- Integer: integer value without decimal point.
- Decimal number: decimal number with decimal point.
- Optionally, you can define a default value by clicking Edit default....
- In the Default Value(s) dialog box type a default value. Click OK.
- Remove a default value by clicking Reset default.
- Click OK.
- You can edit an existing custom field by selecting it and clicking Edit. You can only modify default values.
- If you want to remove an existing custom field, select it from the list and click Delete.
- Create a new custom field by clicking New.
- Click Save & Close in the navigation pane to save the changes.
 For more information on how to open the InLoox PM options, please see
 When a custom field is deleted, all contents of it in all projects are permanently removed from InLoox PM Web App.
 Each created custom field will have its own box on the selected project site. Enter the value in this box.