Create and edit a budget position
Open a project with the existing budget.
![]() For more information on how to create a budget, see Create and edit a budget.
For more information on how to create a budget, see Create and edit a budget.- In the project, in the Start tab, in the Sections group, click Budgets.
- On the Budgets page choose a budget from the budget list, to which you want to add a position. Click New Budget Position or Edit Position.
-
In the New Position / Edit Position do the following:
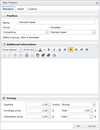
- General information to the budget position on the Standard tab
- In the Name field type a name to change the short position name.
Select one group from the Group list to which the position belongs. The group defines the structuring of position within the system.
![]() The groups can be customized under InLoox PM options. For more information see Generate and edit groups.
The groups can be customized under InLoox PM options. For more information see Generate and edit groups.Select the position you want from the Template list.
![]() For more information on how to create budget positions for template, see Manage budget positions for templates.
For more information on how to create budget positions for template, see Manage budget positions for templates.-
In the Additional information area you can add the important information on this position.
![]() InLoox PM Web App provides you with the range of the formatting features. For the detailed description see Create and change comments in the Customize comments section.
InLoox PM Web App provides you with the range of the formatting features. For the detailed description see Create and change comments in the Customize comments section. On the Pricing area do the following:
![]() In the Pricing area all the fields are filled out automatically, if you have chosen the position with the already added price model. For more information on how to set up the standard pricings model, see Manage budget positions for templates.
In the Pricing area all the fields are filled out automatically, if you have chosen the position with the already added price model. For more information on how to set up the standard pricings model, see Manage budget positions for templates.- In the Quantity field enter the quantity of the selected item, e.g. 95 or 2.34. You can also issue a credit items by entering a negative amounts.
In the Unit(s) enter a value. The selected unit is linked to the according price per unit. Select a unit, if there is more than one, or change the unit price manually.
![]() All prices are without VAT because InLoox records only net earned premiums.
All prices are without VAT because InLoox records only net earned premiums.- Enter Purchase and Disposition price.
- In the Total fields you can see now the position amount ("Price per unit multiplied by quantity").
- More information to the budget position on the Detail tab
-
Click Performed by to add a person's name, which creates this budget position document.
![]()
- Use quick selection to add a new resource. Click Arrow
![]() . You can see in the drop-down list all resources, which have been added to the project.
. You can see in the drop-down list all resources, which have been added to the project. - Send an email message about the new created budget position. Click email icon right to the Performed by field. For more information see Select project team members, in a Send an email message section.
- Use quick selection to add a new resource. Click Arrow
In the Provision date choose a date for the provision services or delivery date.
![]() This date is set automatically as a start date by actual expenses (time tracking) for the time tracking item.
This date is set automatically as a start date by actual expenses (time tracking) for the time tracking item.Select the Billed control box.
![]() Only for the position of the budget types actual expenses or planned expenses. This is set automatically once the position (or the entire document) has been billed.
Only for the position of the budget types actual expenses or planned expenses. This is set automatically once the position (or the entire document) has been billed.Select the Billable control box.
![]() Only for the positions of the budget types actual expenses or planned expenses. The positions with this status are not included in the actual revenues.
Only for the positions of the budget types actual expenses or planned expenses. The positions with this status are not included in the actual revenues.
-
Click Performed by to add a person's name, which creates this budget position document.
- Further information to the budget position on the Custom tab
Click in the previously created custom box and enter a new value for it.
![]() For more information on how to add a new custom field in the InLoox PM Web App see Create custom fields.
For more information on how to add a new custom field in the InLoox PM Web App see Create custom fields.
- General information to the budget position on the Standard tab
- Click OK to save the changes.
 For more information on how to create a budget, see
 All prices are without VAT because InLoox records only net earned premiums.
 . You can see in the drop-down list all resources, which have been added to the project.
 An internal price per hour is in file for each group. The internal prices and the available groups can be customized under Generate and edit groups.