Create task
This is how project tasks can be created in InLoox Web App:
- Manually in a specific project
- AI-assisted in a specific project
- From a time tracking entry
- Copy-Pasting an existing task
- Manually in the global task list
- In the InLoox for Outlook Add-in
- By flagging emails in Outlook
- In your workplace
- From a mindmap
- From an excel file
- From templates
Create tasks in the project
If you want to create a task that should be assigned directly to a project, you can create tasks directly in the Projects area. To do this, go to Projects in the left sidebar and select the desired project by clicking on it. You are directly in the project for which you want to create a new task.
- Click on the Tasks tab, which will open the Kanban board.

- To create a task, click on the button labeled New Task in the upper left corner. The new task will appear in the Kanban board in the leftmost column and in the topmost position.

- Alternatively you can click directly in the desired column on the plus, and a new task appears in the selected category.
-
Now you can add information to the task such as name, description, due date etc. by editing it.
For more information see Edit task.


AI-assisted task creation
PLEASE NOTE This feature was made available with InLoox version 11.17 (March 2025) for the InLoox Enterprise Edition only.
PLEASE NOTE For this feature, you must first allow AI assistance for your InLoox account. Go to the InLoox settings under Organization >> General >> Privacy Settings and enable the AI assistance . You need to have admin rights for your InLoox account to do that.
After you have created a new project and entered the basic project information on the Manage page, go to Tasks.
1. Click on the AI-Assistant icon next to the New Task-button.
![]()
2. The InLoox Task Assistant opens. Enter your prompt in the field. E. g. describe your project and the project's goal and who the stakeholders are.

3. On the range picker, define how detailed the AI-assistant should break down the tasks.
4. Click on Generate tasks and the assistant will go to work. The tasks will have names, planned efforts, and due dates. Low generates 5 tasks, Medium (stage 1) generates 10 tasks, Medium (stage 2) generates 15 tasks, High genereates 20 tasks, Very high generates 25 tasks.
5. Once you have checked the generated tasks, select the tasks you want to use in your project and Add Tasks.
If you are not satisfied with the results, either add more details to your prompt or adjust the level of detail with the range picker.
TIP The video tutorial Task management with Artificial Intelligence - How to use the InLoox AI Assistant shows this feature and the feature creating tasks from Outlook emails with AI step-by-step.
Create a task from a time tracking entry
If you have a time tracking entry in your project, you can create a task from it with this time entry attached. This is useful when you e.g. track the time spent in a call or meeting, book it in a project and realise that more work needs to be done.
1. Open a project, go to Time and click on a time entry to edit it.
2. In the side panel, type the name of the new task in the field task and press enter.

3. The new task ist now created and the time entry is linked to it.
TIPP If you are tracking time with the InLoox for Outlook Add-in, you can create the new task there, too. Simply type in the name of the new task in the time tracking entry.
Copying and pasting tasks in the project
You can select, copy and paste a project task in the Kanban view or in the list view.
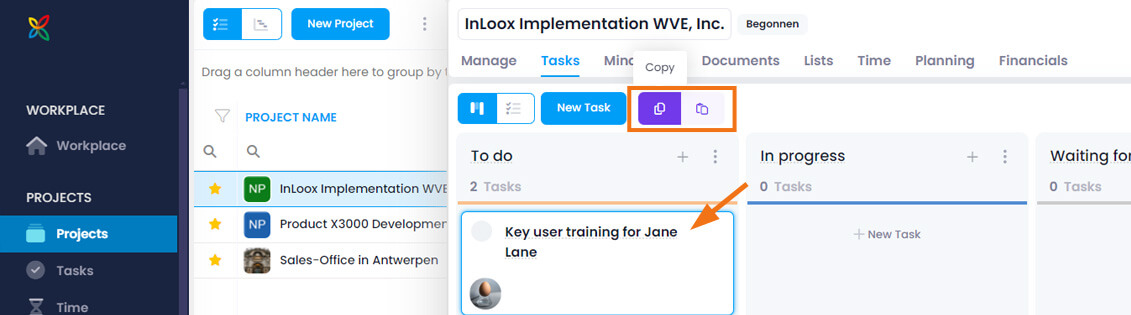
- Select the task.
- Click on the purple Copy button in the menu.
- Then click on the purple Paste button in the menu.
The following information is NOT transferred from the copied task to the pasted task:
- Time tracking entries
- Documents
- Comments
- Changes
Multi-selection of tasks: copy/paste several tasks
If you switch from the Kanban-board into the list view, you can select several tasks (Cmd + click on tasks) and copy/paste them at once.
Create tasks in the global task list
To create a global task, select Tasks in the left sidebar. You are now in the global task list.

- Click on the blue button New task. Now a new task with the name New task appears in your task list.
- When you click on this task, a side panel opens up on the right side, where you can edit your task and enter important information.
-
Give the task a name, select the start and end date with the corresponding time and add a description. In addition, you can add task-relevant documents and assign the task to a group or a project.
For details, see Edit task
Import tasks from an excel file
Note This feature is available with InLoox version 12.2 (July 2025).
With InLoox, you can import tasks quickly and easily from an Excel file. This saves time and makes it easier to transfer existing data.
- Open the relevant project in InLoox or create a new project.
- Click on the “Tasks” tab in the top menu.
- Click on the “Import/Export” button at the top right and select “Import tasks from Excel” from the drop-down menu.
- A dialog window opens where you can upload the desired Excel file.
-
Then, in the Map Excel Columns dialog window, you must match the columns from your Excel file with the existing columns in InLoox:

- On the left-hand side, you will see the columns from your own Excel file. The InLoox columns are then selected on the right-hand side.
- The matching assistant automatically recognizes columns with the same or similar names and suggests direct matching if applicable.
- Alternatively, you can assign the columns manually. The following standard task fields are available in InLoox:

| InLoox field | Description |
| Name | Title of the task (mandatory field) |
| Description | Detailed information on the task |
| Start | Planned start date |
| End | Planned end date / due date |
| Effort | Estimated work effort (e.g. in hours or minutes) |
| Status | Current processing status (e.g. To Do, In Progress, Done) |
| Assignee | Responsible person for the task |
| Custom fields | Custom |
Note You can map more of your Excel columns using custom fields in InLoox. Please note, however, that custom fields must be created and configured correctly before importing into InLoox. You can find more information on the setup in the Help article: Custom fields. Custom fields are only available in the InLoox Enterprise (Plus) and InLoox On-Prem editions.
6. Once you are done with the assignment, click Import. The tasks are then loaded into the Kanban board.
Create tasks by flagging emails in Outlook
Note This feature was introduced in InLoox version 26.1 (February 2026).
Requirements:
- Your InLoox account is linked to your Microsoft 365 account.
- The permission "Create tasks from flagged emails" is enabled in the Integration Center.
- Optional: The permission "Update flags in emails" is enabled to keep flags synchronized between InLoox and Outlook.
When you flag an email in Outlook by clicking the flag icon, a personal task is automatically created in InLoox. This task will appear in your Workplace, where you can further edit it and assign it to a project.
By right-clicking the flag icon, you can set a due date (e.g., tomorrow). This due date will be taken into account when the InLoox task is created.
If you have enabled the optional permission "Update flags in emails" the email in Outlook will automatically be marked as completed as soon as you set the task status to Done in InLoox.
